ClickHouse
The connector library for ClickHouse is clickhouse-connect.
The expected connection string is formatted as follows:
clickhousedb://<user>:<password>@<host>:<port>/<database>[?options…]clickhouse://{username}:{password}@{hostname}:{port}/{database}
Here's a concrete example of a real connection string:
clickhousedb://demo:demo@github.demo.trial.altinity.cloud/default?secure=true
Elasticsearch
The connector library for Elasticsearch is elasticsearch-dbapi.
The connection string for Elasticsearch looks like this:
elasticsearch+http://{user}:{password}@{host}:9200/
Using HTTPS
elasticsearch+https://{user}:{password}@{host}:9200/
Elasticsearch as a default limit of 10000 rows, so you can increase this limit on your cluster or set Superset’s row limit on config
ROW_LIMIT = 10000
You can query multiple indices on SQL Lab for example
SELECT timestamp, agent FROM "logstash"
But, to use visualizations for multiple indices you need to create an alias index on your cluster
POST /_aliases
{
    "actions" : [
        { "add" : { "index" : "logstash-**", "alias" : "logstash_all" } }
    ]
}
Then register your table with the alias name logstash_all
Time zone
By default, Skeyecharts uses UTC time zone for elasticsearch query. If you need to specify a time zone, please edit your Database and enter the settings of your specified time zone in the Other > ENGINE PARAMETERS:
{
    "connect_args": {
        "time_zone": "Asia/Shanghai"
    }
}
Another issue to note about the time zone problem is that before elasticsearch7.8, if you want to convert a string into a DATETIME object,
you need to use the CAST function,but this function does not support our time_zone setting. So it is recommended to upgrade to the version after elasticsearch7.8.
After elasticsearch7.8, you can use the DATETIME_PARSE function to solve this problem.
The DATETIME_PARSE function is to support our time_zone setting, and here you need to fill in your elasticsearch version number in the Other > VERSION setting.
the skeyecharts will use the DATETIME_PARSE function for conversion.
Disable SSL Verification
To disable SSL verification, add the following to the SQLALCHEMY URI field:
elasticsearch+https://{user}:{password}@{host}:9200/?verify_certs=False
Google BigQuery
The connector library for BigQuery is sqlalchemy-bigquery.
Connecting to BigQuery
When adding a new BigQuery connection in Skeyecharts, you'll need to add the GCP Service Account credentials file (as a JSON).
- Create your Service Account via the Google Cloud Platform control panel, provide it access to the appropriate BigQuery datasets, and download the JSON configuration file for the service account.
- In Skeyecharts, you can either upload that JSON or add the JSON blob in the following format (this should be the content of your credential JSON file):
{
        "type": "service_account",
        "project_id": "...",
        "private_key_id": "...",
        "private_key": "...",
        "client_email": "...",
        "client_id": "...",
        "auth_uri": "...",
        "token_uri": "...",
        "auth_provider_x509_cert_url": "...",
        "client_x509_cert_url": "..."
    }
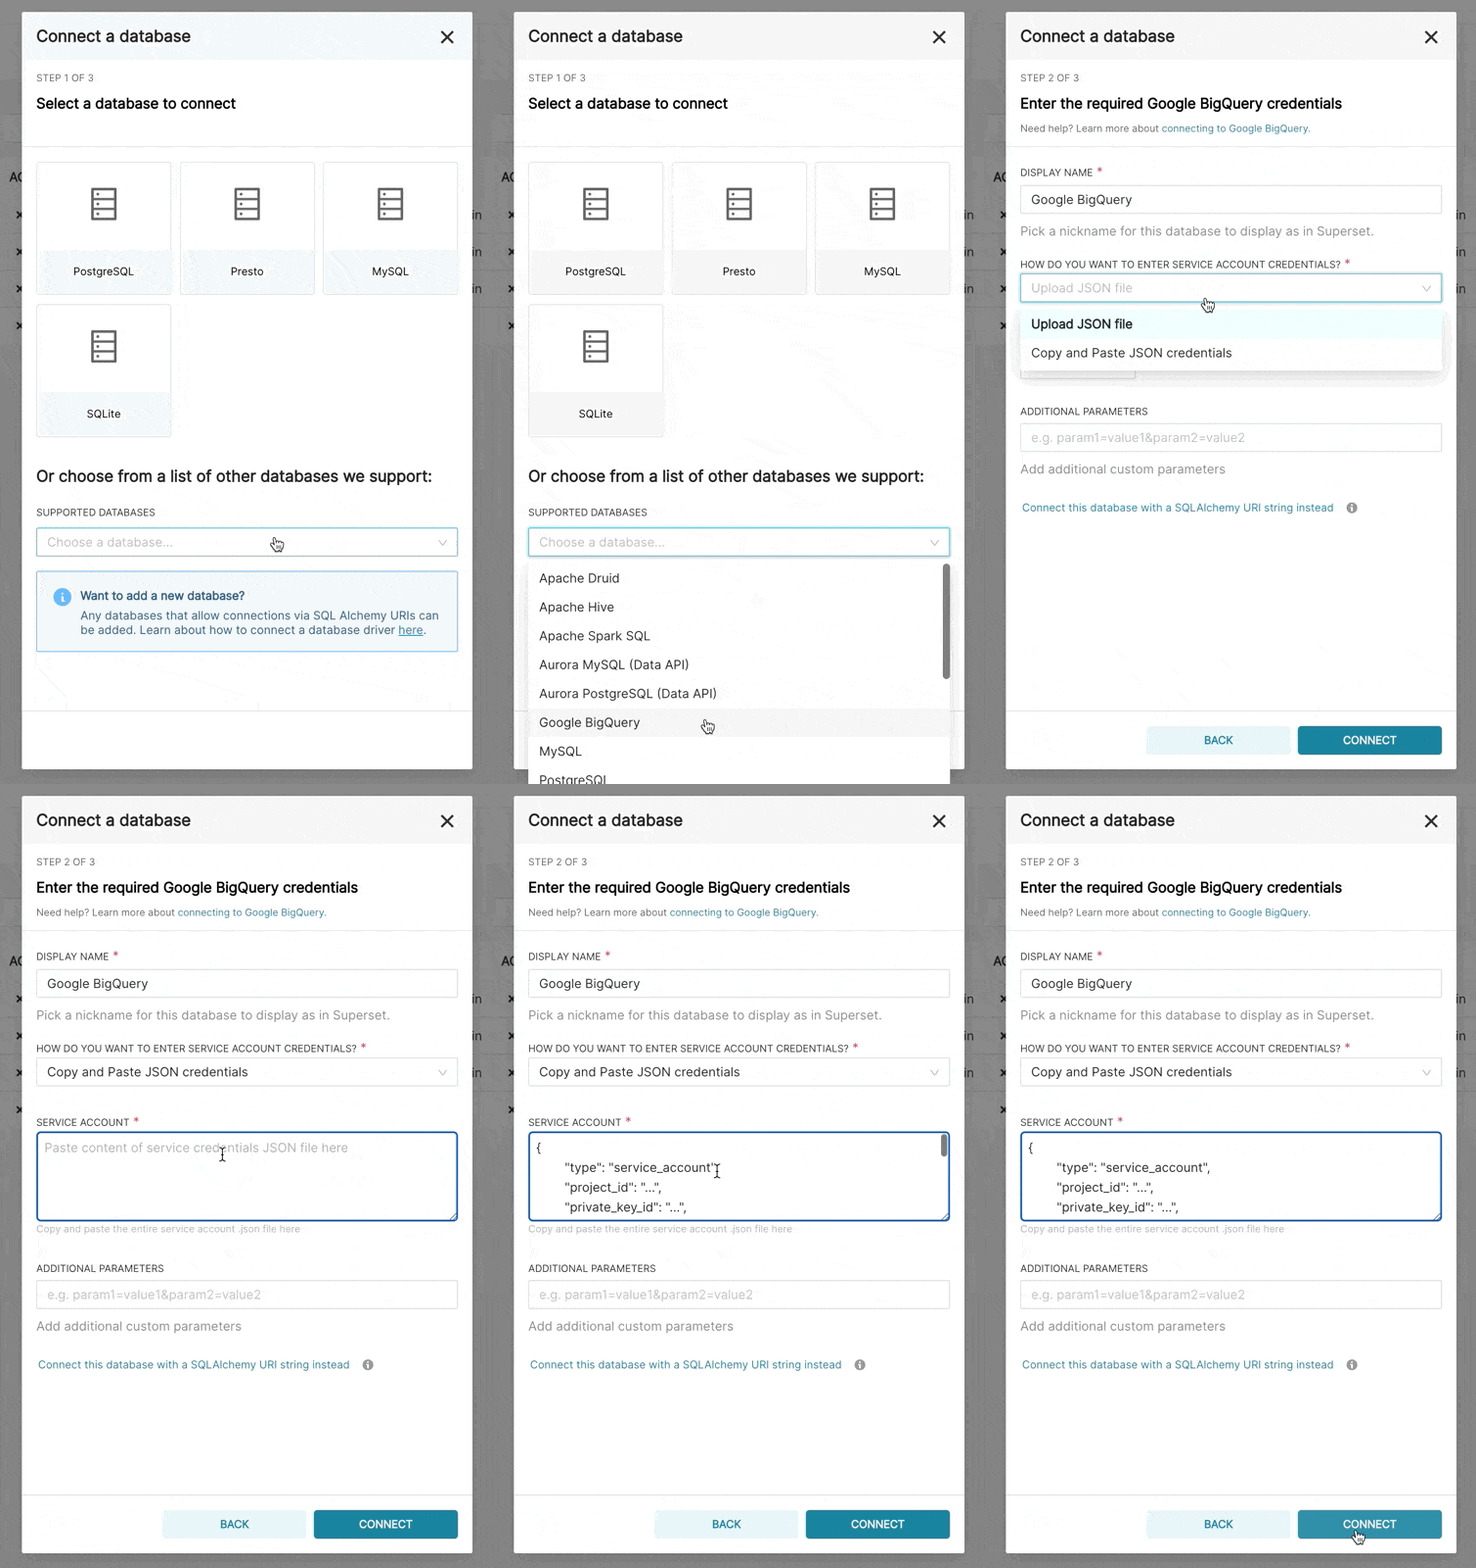
-
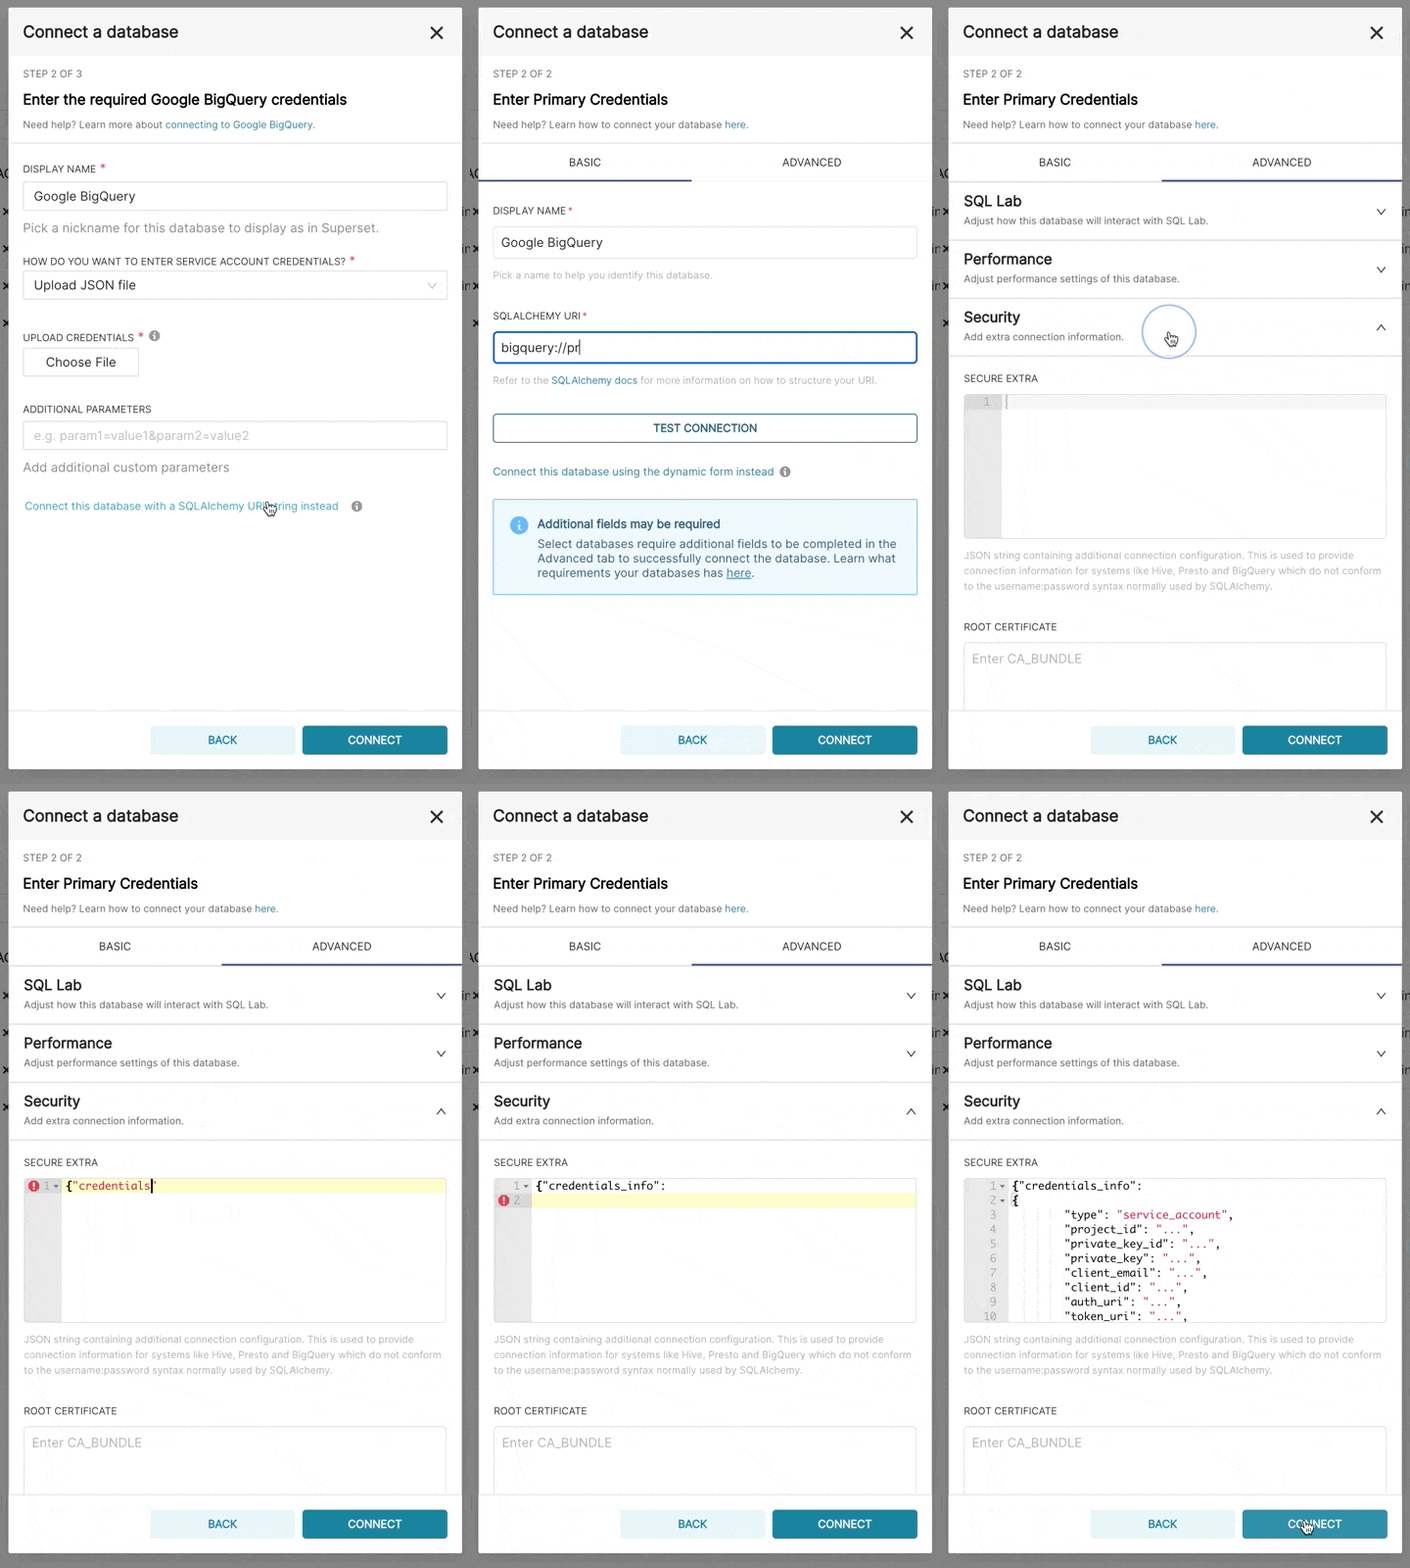
Additionally, can connect via SQLAlchemy URI instead
The connection string for BigQuery looks like:
bigquery://{project_id}Go to the Advanced tab, Add a JSON blob to the Secure Extra field in the database configuration form with the following format:
{
"credentials_info": <contents of credentials JSON file>
}
The resulting file should have this structure:
{
 "credentials_info": {
     "type": "service_account",
     "project_id": "...",
     "private_key_id": "...",
     "private_key": "...",
     "client_email": "...",
     "client_id": "...",
     "auth_uri": "...",
     "token_uri": "...",
     "auth_provider_x509_cert_url": "...",
     "client_x509_cert_url": "..."
     }
 }
You should then be able to connect to your BigQuery datasets.
MySQL
The connector library for MySQL is mysqlclient.
Here's the connection string:
mysql://{username}:{password}@{host}/{database}
Host:
- For Localhost:
localhostor127.0.0.1 - Docker running on Linux:
172.18.0.1 - For On Prem: IP address or Host name
- For Docker running in OSX:
docker.for.mac.host.internalPort:3306by default
One problem with mysqlclient is that it will fail to connect to newer MySQL databases using caching_sha2_password for authentication, since the plugin is not included in the client. In this case, you should use mysql-connector-python instead:
mysql+mysqlconnector://{username}:{password}@{host}/{database}
Oracle
The connector library is cx_Oracle.
The connection string is formatted as follows:
oracle://<username>:<password>@<hostname>:<port>
Postgres
Postgres sample connection parameters:
- User Name: UserName
- Password: DBPassword
- Database Host: IP address or Host name
- Database Name: Database Name
- Port: default 5432
The connection string looks like:
postgresql://{username}:{password}@{host}:{port}/{database}
You can require SSL by adding ?sslmode=require at the end:
postgresql://{username}:{password}@{host}:{port}/{database}?sslmode=require
You can read about the other SSL modes that Postgres supports in Table 31-1 from this documentation.
More information about PostgreSQL connection options can be found in the SQLAlchemy docs and the PostgreSQL docs.
Presto
The pyhive library is used to connect to Presto through SQLAlchemy.
The expected connection string is formatted as follows:
presto://{hostname}:{port}/{database}
You can pass in a username and password as well:
presto://{username}:{password}@{hostname}:{port}/{database}
Here is an example connection string with values:
presto://datascientist:securepassword@presto.example.com:8080/hive
By default Skeyecharts assumes the most recent version of Presto is being used when querying the datasource. If you’re using an older version of Presto, you can configure it in the extra parameter:
{
    "version": "0.123"
}
Snowflake
The connector library for Snowflake is snowflake-sqlalchemy.
The connection string for Snowflake looks like this:
snowflake://{user}:{password}@{account}.{region}/{database}?role={role}&warehouse={warehouse}
The schema is not necessary in the connection string, as it is defined per table/query. The role and warehouse can be omitted if defaults are defined for the user, i.e.
snowflake://{user}:{password}@{account}.{region}/{database}
Make sure the user has privileges to access and use all required databases/schemas/tables/views/warehouses, as the Snowflake SQLAlchemy engine does not test for user/role rights during engine creation by default. However, when pressing the “Test Connection” button in the Create or Edit Database dialog, user/role credentials are validated by passing “validate_default_parameters”: True to the connect() method during engine creation. If the user/role is not authorized to access the database, an error is recorded in the Skeyecharts logs.
And if you want connect Snowflake with Key Pair Authentication. Please make sure you have the key pair and the public key is registered in Snowflake. To connect Snowflake with Key Pair Authentication, you need to add the following parameters to "SECURE EXTRA" field.
Please note that you need to merge multi-line private key content to one line and insert \n between each line
{
     "auth_method": "keypair",
     "auth_params": {
         "privatekey_body": "-----BEGIN ENCRYPTED PRIVATE KEY-----\n...\n...\n-----END ENCRYPTED PRIVATE KEY-----",
         "privatekey_pass":"Your Private Key Password"
     }
 }
If your private key is stored on server, you can replace "privatekey_body" with “privatekey_path” in parameter.
{
    "auth_method": "keypair",
    "auth_params": {
        "privatekey_path":"Your Private Key Path",
        "privatekey_pass":"Your Private Key Password"
    }
}
SQL Server
The connector library for SQL Server is pymssql.
The connection string for SQL Server looks like this:
mssql+pymssql://<Username>:<Password>@<Host>:<Port-default:1433>/<Database Name>/?Encrypt=yes
Teradata
The connector library is teradatasqlalchemy.
The connection string for Teradata looks like this:
teradatasql://{user}:{password}@{host}