HTTP Client
The HTTP Client destination writes data to an HTTP endpoint. The destination sends requests to an HTTP resource URL. Use the HTTP Client destination to perform a range of standard requests or use an expression to determine the request for each record.
The destination can also send responses to a microservice origin when used in a microservice pipeline.
When you configure the HTTP Client destination, you define the resource URL, headers, and method to use for the requests. You configure the destination to generate one request for each record or it to generate a single request containing all records in the batch.
You can configure the timeout, request transfer encoding, and authentication type. You can configure the destination to use the Gzip or Snappy compression format to write the messages. You can also configure the processor to log request and response information.
You can optionally use an HTTP proxy and configure SSL/TLS properties. You can also configure the destination to use the OAuth 2 protocol to connect to an HTTP service.
When you want the destination to send responses to a microservice origin within a microservice pipeline, you specify the type of response to send.
HTTP Method
You can use the following methods with the HTTP Client destination:
- GET
- PUT
- POST
- DELETE
- HEAD
- PATCH
- Expression - An expression that evaluates to one of the other methods.
Expression Method
The Expression method allows you to write an expression that evaluates to a standard HTTP method. Use the Expression method to generate a workflow. For example, you can use an expression that passes data to the server (PUT) based on the data in a field.
Number of Requests
The HTTP Client destination can generate one HTTP request for each record, or it can generate a single request containing all records in the batch.
Configure the destination to generate requests in one of the following ways:
Multiple requests per batch
By default, the destination generates one HTTP request for each record in the batch and sends multiple requests at a time. To preserve record order, the destination waits until all requests for the entire batch are completed before processing the next batch.
When the destination generates multiple requests per batch, you specify the maximum number of parallel requests. Default is 1. Increasing the number of parallel requests can improve performance but increases the load on the server. Network latency can also significantly impact the performance when sending multiple parallel requests.
Single request per batch
If you enable the One Request per Batch property, the destination generates a single HTTP request containing all records in the batch.
When the destination generates a single request per batch, it ignores the value entered for the maximum number of parallel requests. Generating a single request per batch can improve performance, depending on the amount of data sent in the request.
Logging Request and Response Data
The HTTP Client destination can log request and response data to the Data Collector log.
When enabling logging, you configure the following properties:
Verbosity
The type of data to include in logged messages:
- Headers_Only - Includes request and response headers.
- Payload_Text - Includes request and response headers as well as any text payloads.
- Payload_Any - Includes request and response headers and the payload, regardless of type.
Log Level
The level of messages to include in the Data Collector log. When you select a level, higher level messages are also logged. That is, if you select the Warning log level, then Severe and Warning messages are written to the Data Collector log.
Note: The configured log level for Data Collector can limit the level of detail that is logged. For example, if you set the log level to Finest to log detailed trace information, but Data Collector is configured for ERROR, then the origin only writes Severe level messages.
The following table describes the stage log levels and the corresponding Data Collector log levels needed to enable the logging:
| Stage Log Level | Data Collector | Description |
|---|---|---|
| Severe | ERROR | Only messages indicating serious failures. |
| Warning | WARN | Messages warning of potential problems. |
| Info | INFO | Informational messages. |
| Fine | DEBUG | Basic tracing information. |
| Finer | DEBUG | Detailed tracing information. |
| Finest | TRACE | Highly detailed tracing information. |
The name of this stage logger is com.majesteye.skeye.skeyeingest.http.RequestLogger.
Max entity size
The maximum size of message data to write to the log. Use to limit the volume of data written to the Data Collector log for any single message.
Send Microservice Responses
The HTTP Client destination can send responses to a microservice origin when you use the destination in a microservice pipeline.
When sending responses to a microservice origin, the destination can send one of the following:
- All successfully written records.
- Responses from the destination system - For information about the possible responses, see the documentation for the destination system.
OAuth 2 Authorization
The HTTP Client destination can use the OAuth 2 protocol to connect to an HTTP service.
The HTTP Client destination can use the OAuth 2 protocol to connect to an HTTP service that uses basic, digest, or universal authentication, OAuth 2 client credentials, OAuth 2 username and password, or OAuth 2 JSON Web Tokens (JWT).
The OAuth 2 protocol authorizes third-party access to HTTP service resources without sharing credentials. The HTTP Client destination uses credentials to request an access token from the service. The service returns the token to the destination, and then the destination includes the token in a header in each request to the resource URL.
The credentials that you enter to request an access token depend on the credentials grant type required by the HTTP service. You can define the following OAuth 2 credentials grant types for HTTP Client:
Client credentials grant
HTTP Client sends its own credentials - the client ID and client secret or the basic, digest, or universal authentication credentials - to the HTTP service. For example, use the client credentials grant to process data from the Twitter API or from the Microsoft Azure Active Directory (Azure AD) API.
For more information about the client credentials grant, see https://tools.ietf.org/html/rfc6749#section-4.4.
Resource owner password credentials grant
HTTP Client sends the credentials for the resource owner - the resource owner username and password - to the HTTP service. Or, you can use this grant type to migrate existing clients using basic, digest, or universal authentication to OAuth 2 by converting the stored credentials to an access token.
For example, use this grant to process data from the Getty Images API. For more information about using OAuth 2 to connect to the Getty Images API, see http://developers.gettyimages.com/api/docs/v3/oauth2.html.
For more information about the resource owner password credentials grant, see https://tools.ietf.org/html/rfc6749#section-4.3.
JSON Web Tokens (JWT)
HTTP Client sends a JSON-based security token encoding to the HTTP service. For example, use JSON Web Tokens to process data from the Google API.
Let’s look at some examples of how to configure authentication and OAuth 2 authorization to process data from Twitter, Microsoft Azure AD, and Google APIs.
Example for Twitter
To use OAuth 2 authorization to write to Twitter, configure HTTP Client to use basic authentication and the client credentials grant.
For more information about configuring OAuth 2 authorization for Twitter, see https://developer.twitter.com/en/docs/authentication/oauth-2-0/application-only.
-
On the HTTP tab, set Authentication Type to Basic, and then select Use OAuth 2.
-
Change the default value of the Resource URL property to define a Twitter URL that works with OAuth 2 authorization.
The default URL is not valid when using OAuth2 authorization.
For example, you might define the following URL that works with OAuth 2 authorization:
https://api.twitter.com/1.1/search/tweets.json?q=%23DataOps -
On the Credentials tab, enter the Twitter consumer API key and consumer API secret key for the Username and Password properties.
Tip: To secure sensitive information such as the consumer API keys, you can use runtime resources or credential stores.
-
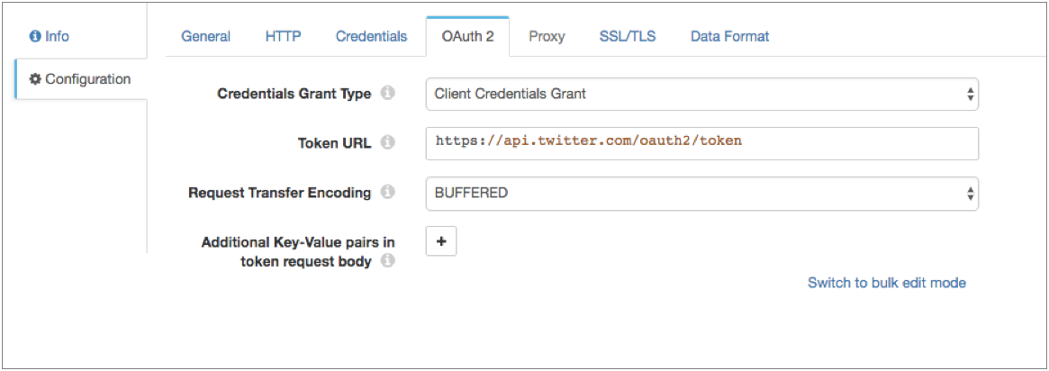
On the OAuth 2 tab, select Client Credentials Grant for the grant type.
-
In the Token URL property, enter the following URL used to request the access token:
https://api.twitter.com/oauth2/token
The following image shows the OAuth 2 tab configured for Twitter:
Example for Microsoft Azure AD
To use OAuth 2 authorization to write to Microsoft Azure AD, configure HTTP Client to use no authentication and the client credentials grant.
Note: This example uses Microsoft Azure AD version 1.0.
For more information about configuring OAuth 2 authorization for Microsoft Azure AD, see https://docs.microsoft.com/en-us/azure/active-directory/develop/active-directory-protocols-oauth-code.
-
On the HTTP tab, set Authentication Type to None, and then select Use OAuth 2.
-
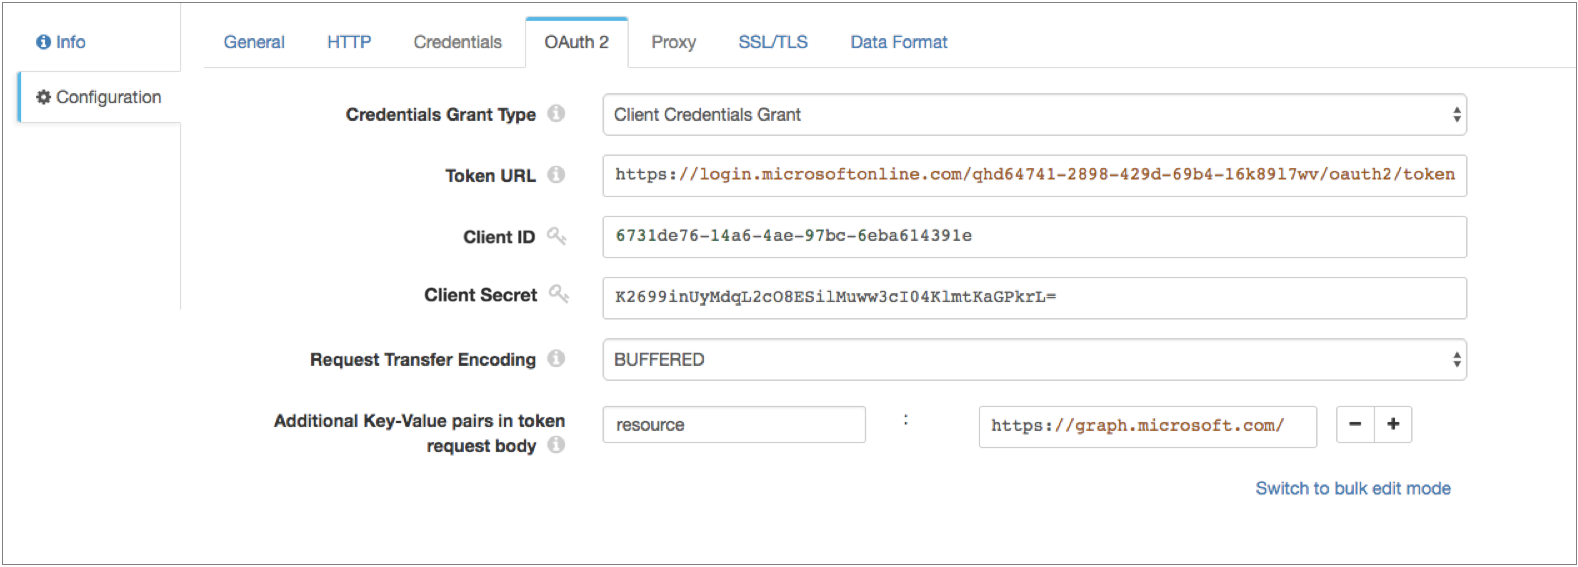
On the OAuth 2 tab, select Client Credentials Grant for the grant type.
-
In the Token URL property, enter the following URL used to request the access token:
https://login.microsoftonline.com/<tenant identifier>/oauth2/tokenWhere
<tenant identifier>is the Azure AD tenant identifier. -
Enter the OAuth 2 client ID and secret.
The client ID is the Application Id assigned to your app when you registered it with Azure AD, found in the Azure Classic Portal.
The client secret is the application secret that you created in the app registration portal for your app.
Tip: To secure sensitive information such as the client ID and secret, you can use runtime resources or credential stores.
-
Add any key-value pairs that the HTTP service requires in the token request.
In our example, we are accessing the
graph.microsoft.comAPI in our resource URL, so we need to add the following key-value pair:resource : https://graph.microsoft.com/
The following image shows the OAuth 2 tab configured for Microsoft Azure AD version 1.0:
Example for Google
To use OAuth 2 authorization to write to Google service accounts, configure HTTP Client to use no authentication and the JSON Web Tokens grant.
For more information about Google service accounts, see the Google Cloud documentation: Understanding service accounts.
For more information about configuring OAuth 2 authorization for Google, see the Google Identity Platform documentation: Using OAuth 2.0 to Access Google APIs.
-
On the HTTP tab, set Authentication Type to None, and then select Use OAuth 2.
-
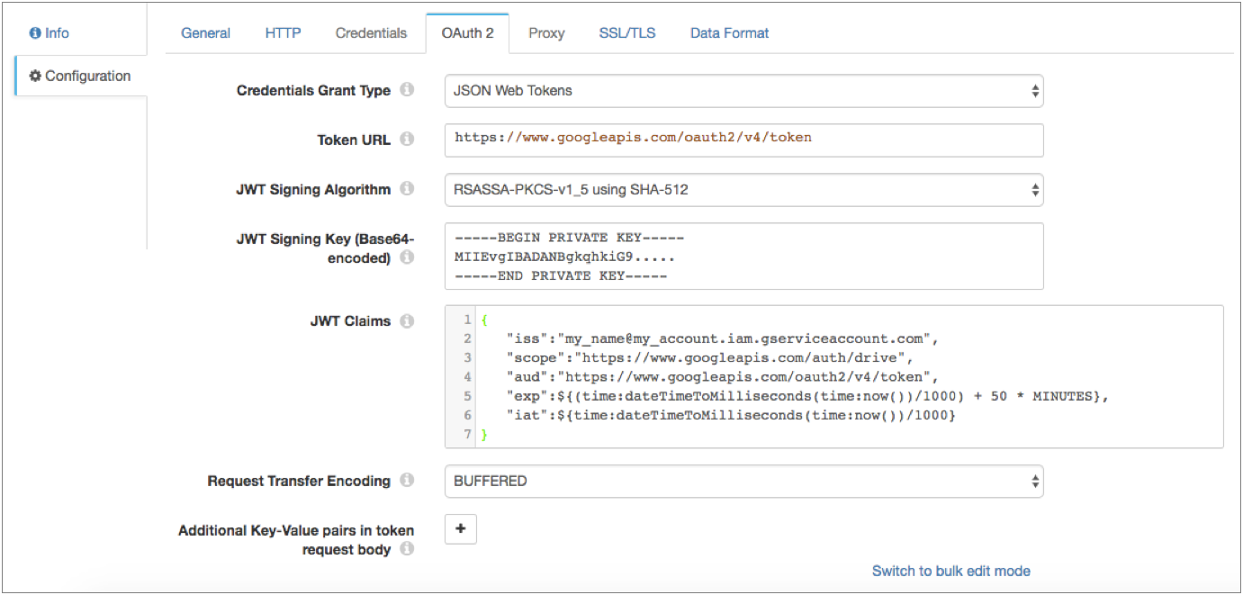
On the OAuth 2 tab, select JSON Web Tokens for the grant type.
-
In the Token URL property, enter the following URL used to request the access token:
https://www.googleapis.com/oauth2/v4/token -
Select the following algorithm to sign the JWT: RSASSA-PKCS-v1_5 using SHA-256.
-
Enter the Base64 encoded key used to sign the JWT.
To access the key, download the JSON key file when you generate the Google credentials. Locate the "private_key" field in the file, which contains a string version of the key. Copy the string into the JWT Signing Key property, and then replace all "\n" literals with new lines.
Tip: To secure sensitive information such as the JWT signing key, you can use runtime resources or credential stores.
-
In the JWT Claims property, enter the required claims to use with the JWT token request, in JSON format.
For information about claim requirements when calling a Google API, see the Google Identity Platform documentation: Addendum: service account authorization without OAuth.
For a list of scopes for the scope claim, see the Google Identity Platform documentation: OAuth 2.0 Scopes for Google APIs.
For example, enter the claims in the following JSON format:
{
   "iss":"my_name@my_account.iam.gserviceaccount.com",
   "scope":"https://www.googleapis.com/auth/drive",
   "aud":"https://www.googleapis.com/oauth2/v4/token",
   "exp":${(time:dateTimeToMilliseconds(time:now())/1000) + 50 * MINUTES},
   "iat":${time:dateTimeToMilliseconds(time:now())/1000}
}
You can include the expression language in the JWT claims. For example, in the sample claim above, both the "exp" (expiration time) claim and the "iat" (issued at) claim include Data Collector time functions to set the expiration time and the issue time.
Tip: Google access tokens expire after 60 minutes. As a result, set the expiration time claim to be slightly less than 60 minutes so that HTTP Client can request a new token within the time limit.
The following image shows the OAuth 2 tab configured for Google service accounts:
Data Formats
HTTP Client writes data to HTTP endpoints based on the data format that you select.
The HTTP Client destination processes data formats as follows:
Avro
The stage writes records based on the Avro schema. You can use one of the following methods to specify the location of the Avro schema definition:
-
In Pipeline Configuration - Use the schema that you provide in the stage configuration.
-
In Record Header - Use the schema included in the avroSchema record header attribute.
-
Confluent Schema Registry - Retrieve the schema from Confluent Schema Registry. The Confluent Schema Registry is a distributed storage layer for Avro schemas. You can configure the destination to look up the schema in the Confluent Schema Registry by the schema ID or subject.
If using the Avro schema in the stage or in the record header attribute, you can optionally configure the stage to register the Avro schema with the Confluent Schema Registry. You can also optionally include the schema definition in the message. Omitting the schema definition can improve performance, but requires the appropriate schema management to avoid losing track of the schema associated with the data.
You can include the Avro schema in the output.
You can also compress data with an Avro-supported compression codec. When using Avro compression, avoid configuring any other compression properties in the stage.
Binary
The stage writes binary data to a single field in the record.
Delimited
The destination writes records as delimited data. When you use this data format, the root field must be list or list-map.
You can use the following delimited format types:
- Default CSV - File that includes comma-separated values. Ignores empty lines in the file.
- RFC4180 CSV - Comma-separated file that strictly follows RFC4180 guidelines.
- MS Excel CSV - Microsoft Excel comma-separated file.
- MySQL CSV - MySQL comma-separated file.
- Tab-Separated Values - File that includes tab-separated values.
- PostgreSQL CSV - PostgreSQL comma-separated file.
- PostgreSQL Text - PostgreSQL text file.
- Custom - File that uses user-defined delimiter, escape, and quote characters.
- Multi Character Delimited - File that uses multiple user-defined characters to delimit fields and lines, and single user-defined escape and quote characters.
JSON
The destination writes records as JSON data. You can use one of the following formats:
- Array - Each file includes a single array. In the array, each element is a JSON representation of each record.
- Multiple objects - Each file includes multiple JSON objects. Each object is a JSON representation of a record.
Protobuf
Writes one record in a message. Uses the user-defined message type and the definition of the message type in the descriptor file to generate the message.
For information about generating the descriptor file, see Protobuf Data Format Prerequisites.
SDC Record
The destination writes records in the SDC Record data format.
Text
The destination writes data from a single text field to the destination system. When you configure the stage, you select the field to use.
You can configure the characters to use as record separators. By default, the destination uses a UNIX-style line ending (\n) to separate records.
When a record does not contain the selected text field, the destination can report the missing field as an error or to ignore the missing field. By default, the destination reports an error.
When configured to ignore a missing text field, the destination can discard the record or write the record separator characters to create an empty line for the record. By default, the destination discards the record.
Configuring an HTTP Client Destination
Configure an HTTP Client destination to write data to an HTTP endpoint.
-
In the Properties panel, on the General tab, configure the following properties:
General Property Description Name Stage name. Description Optional description. Required Fields Fields that must include data for the record to be passed into the stage.
Tip: You might include fields that the stage uses.
Records that do not include all required fields are processed based on the error handling configured for the pipeline.Preconditions Conditions that must evaluate to TRUE to allow a record to enter the stage for processing. Click Add to create additional preconditions.
Records that do not meet all preconditions are processed based on the error handling configured for the stage.On Record Error Error record handling for the stage:
_ Discard - Discards the record.
_ Send to Error - Sends the record to the pipeline for error handling.
* Stop Pipeline - Stops the pipeline. Not valid for cluster pipelines. -
On the HTTP tab, configure the following properties:
HTTP Property Description Resource URL HTTP resource URL. Headers The headers to include in the request. Using simple or bulk edit mode, click the Add icon to add additional headers. HTTP Method HTTP request method. Use one of the standard methods or use Expression to enter an expression. HTTP Method Expression Expression that evaluates to a standard HTTP method.
Used for the Expression method only.Maximum Parallel Requests Maximum number of requests to send to the server at one time when the destination generates one request for each record in the batch. Authentication Type Determines the authentication type used to connect to the server:
_ None - Performs no authentication.
_ Basic - Uses basic authentication. Requires a username and password.
Use with HTTPS to avoid passing unencrypted credentials.
_ Digest - Uses digest authentication. Requires a username and password.
_ Universal - Makes an anonymous connection, then provides authentication credentials upon receiving a 401 status and a WWW-Authenticate header request.
Requires a username and password associated with basic or digest authentication.
Use only with servers that respond to this workflow.
* OAuth - Uses OAuth 1.0 authentication. Requires OAuth credentials.Use OAuth 2 Enables using OAuth 2 authorization to request access tokens.
You can use OAuth 2 authorization with none, basic, digest, or universal authentication.Request Transfer Encoding Use one of the following encoding types:
_ Buffered - The standard transfer encoding type.
_ Chunked - Transfers data in chunks. Not supported by all servers.
Default is Buffered.HTTP Compression Compression format for the messages:
_ None
_ Snappy
* GzipConnect Timeout Maximum number of milliseconds to wait for a connection. Read Timeout Maximum number of milliseconds to wait for data. One Request per Batch Enables generating a single request containing all records in the batch. Use Proxy Enables using an HTTP proxy to connect to the system. Rate Limit Minimum amount of time between requests in seconds. Set a rate limit when sending requests to a rate-limited API.
Default is 0, which means there is no delay between requests.Maximum Request Time Maximum number of seconds to wait for a request to complete. -
When using Basic authentication, on the Credentials tab, configure the following properties:
Credentials Property Description Username User name for basic, digest, or universal authentication. Password Password for basic, digest, or universal authentication.
Tip: To secure sensitive information such as user names and passwords, you can use runtime resources or credential stores. -
When using OAuth 2 authorization, on the OAuth 2 tab, configure the following properties.
For more information about OAuth 2 and for example OAuth 2 configurations to read from Twitter, Microsoft Azure AD, or Google APIs, see OAuth 2 Authorization.
OAuth 2 Property Description Credentials Grant Type Type of client credentials grant type required by the HTTP service:
_ Client credentials grant
_ Resource owner password credentials grant
* JSON Web Tokens (JWT)Token URL URL to request the access token. User Name Resource owner user name.
Enter for the resource owner password credentials grant.Password Resource owner password.
Enter for the resource owner password credentials grant.
Tip: To secure sensitive information such as user names and passwords, you can use runtime resources or credential stores.Client ID Client ID that the HTTP service uses to identify the HTTP client.
Enter for the client credentials grant that uses a client ID and secret for authentication. Or, for the resource owner password credentials grant that requires a client ID and secret.Client Secret Client secret that the HTTP service uses to authenticate the HTTP client.
Enter for the client credentials grant that uses a client ID and secret for authentication. Or, for the resource owner password credentials grant that requires a client ID and secret.
Tip: To secure sensitive information such as the client ID and secret, you can use runtime resources or credential stores.JWT Signing Algorithm Algorithm used to sign the JSON Web Token (JWT).
Default is none. Enter for the JSON Web Tokens grant.JWT Signing Key Base64 encoded key used to sign the JSON Web Token, if you selected a signing algorithm.
Tip: To secure sensitive information such as the JWT signing key, you can use runtime resources or credential stores.
Enter for the JSON Web Tokens grant.JWT Claims Claims to use in the JSON Web Token request, entered in JSON format. Enter each claim required by the HTTP service. You can include the expression language in the JWT claims.
For example, to read from Google service accounts, enter the following claims with the appropriate values:<br/>{<br/> "iss":"my_name@my_account.iam.gserviceaccount.com",<br/> "scope":"https://www.googleapis.com/auth/drive",<br/> "aud":"https://www.googleapis.com/oauth2/v4/token",<br/> "exp":${(time:dateTimeToMilliseconds(time:now())/1000) + 50 * 60},<br/> "iat":${time:dateTimeToMilliseconds(time:now())/1000}<br/>}<br/>
Enter for the JSON Web Tokens grant.Request Transfer Encoding Form of encoding to use when the stage requests an access token: buffered or chunked.
Default is chunked.Additional Key-Value Pairs Optional key-value pairs to send to the token URL when requesting an access token. For example, you can define the OAuth 2 scoperequest parameter.
Using simple or bulk edit mode, click the Add icon to add additional key-value pairs. -
To use an HTTP proxy, on the Proxy tab, configure the following properties:
HTTP Proxy Property Description Proxy URI Proxy URI. Username Proxy user name. Password Proxy password.
Tip: To secure sensitive information such as user names and passwords, you can use runtime resources or credential stores. -
To use SSL/TLS, on the TLS tab, configure the following properties:
TLS Property Description Use TLS Enables the use of TLS. Use Remote Keystore Enables loading the contents of the keystore from a remote credential store or from values entered in the stage properties. For more information, see Remote Keystore and Truststore. Private Key Private key used in the remote keystore. Enter a credential function that returns the key or enter the contents of the key. Certificate Chain Each PEM certificate used in the remote keystore. Enter a credential function that returns the certificate or enter the contents of the certificate.
Using simple or bulk edit mode, click the Add icon to add additional certificates.Keystore File Path to the local keystore file. Enter an absolute path to the file or a path relative to the Data Collector resources directory: $SDC_RESOURCES.
For more information about environment variables, see Data Collector Environment Configuration.
By default, no keystore is used.Keystore Type Type of keystore to use. Use one of the following types:
_ Java Keystore File (JKS)
_ PKCS #12 (p12 file)
Default is Java Keystore File (JKS).Keystore Password Password to the keystore file. A password is optional, but recommended.
Tip: To secure sensitive information such as passwords, you can use runtime resources or credential stores.Keystore Key Algorithm Algorithm to manage the keystore.
Default is SunX509.Use Remote Truststore Enables loading the contents of the truststore from a remote credential store or from values entered in the stage properties. For more information, see Remote Keystore and Truststore. Trusted Certificates Each PEM certificate used in the remote truststore. Enter a credential function that returns the certificate or enter the contents of the certificate.
Using simple or bulk edit mode, click the Add icon to add additional certificates.Truststore File Path to the local truststore file. Enter an absolute path to the file or a path relative to the Data Collector resources directory: $SDC_RESOURCES.
For more information about environment variables, see Data Collector Environment Configuration.
By default, no truststore is used.Truststore Type Type of truststore to use. Use one of the following types:
_ Java Keystore File (JKS)
_ PKCS #12 (p12 file)
Default is Java Keystore File (JKS).Truststore Password Password to the truststore file. A password is optional, but recommended.
Tip: To secure sensitive information such as passwords, you can use runtime resources or credential stores.Truststore Trust Algorithm Algorithm to manage the truststore.
Default is SunX509.Use Default Protocols Uses the default TLSv1.2 transport layer security (TLS) protocol. To use a different protocol, clear this option. Transport Protocols TLS protocols to use. To use a protocol other than the default TLSv1.2, click the Add icon and enter the protocol name. You can use simple or bulk edit mode to add protocols.
Note: Older protocols are not as secure as TLSv1.2.Use Default Cipher Suites Uses a default cipher suite for the SSL/TLS handshake. To use a different cipher suite, clear this option. Cipher Suites Cipher suites to use. To use a cipher suite that is not a part of the default set, click the Add icon and enter the name of the cipher suite. You can use simple or bulk edit mode to add cipher suites.
Enter the Java Secure Socket Extension (JSSE) name for the additional cipher suites that you want to use. -
On the Data Format tab, configure the following property:
Data Format Property Description Data Format Data format for messages. Use one of the following data formats:
_ Avro
_ Binary
_ Delimited
_ JSON
_ Protobuf
_ SDC Record
* Text -
For Avro data, on the Data Format tab, configure the following properties:
Avro Property Description Avro Schema Location Location of the Avro schema definition to use when writing data:
_ In Pipeline Configuration - Use the schema that you provide in the stage configuration.
_ In Record Header - Use the schema in the avroSchema record header attribute. Use only when the avroSchema attribute is defined for all records.
* Confluent Schema Registry - Retrieve the schema from Confluent Schema Registry.Avro Schema Avro schema definition used to write the data.
You can optionally use theruntime:loadResourcefunction to load a schema definition stored in a runtime resource file.Register Schema Registers a new Avro schema with Confluent Schema Registry. Schema Registry URLs Confluent Schema Registry URLs used to look up the schema or to register a new schema. To add a URL, click Add and then enter the URL in the following format: <br/>http://<host name>:<port number><br/>Basic Auth User Info User information needed to connect to Confluent Schema Registry when using basic authentication.
Enter the key and secret from theschema.registry.basic.auth.user.infosetting in Schema Registry using the following format:<br/><key>:<secret><br/>
Tip: To secure sensitive information such as user names and passwords, you can use runtime resources or credential stores.Look Up Schema By Method used to look up the schema in Confluent Schema Registry:
_ Subject - Look up the specified Avro schema subject.
_ Schema ID - Look up the specified Avro schema ID.Schema Subject Avro schema subject to look up or to register in Confluent Schema Registry.
If the specified subject to look up has multiple schema versions, the stage uses the latest schema version for that subject. To use an older version, find the corresponding schema ID, and then set the Look Up Schema By property to Schema ID.Schema ID Avro schema ID to look up in Confluent Schema Registry. Include Schema Includes the schema in each message.
Note: Omitting the schema definition can improve performance, but requires the appropriate schema management to avoid losing track of the schema associated with the data.Avro Compression Codec The Avro compression type to use.
When using Avro compression, do not enable other compression available in the destination. -
For binary data, on the Data Format tab, configure the following property:
Binary Property Description Binary Field Path Field that contains the binary data. -
For delimited data, on the Data Format tab, configure the following properties:
Delimited Property Description Delimiter Format Format for delimited data:
_ Default CSV - File that includes comma-separated values. Ignores empty lines in the file.
_ RFC4180 CSV - Comma-separated file that strictly follows RFC4180 guidelines.
_ MS Excel CSV - Microsoft Excel comma-separated file.
_ MySQL CSV - MySQL comma-separated file.
_ Tab-Separated Values - File that includes tab-separated values.
_ PostgreSQL CSV - PostgreSQL comma-separated file.
_ PostgreSQL Text - PostgreSQL text file.
_ Custom - File that uses user-defined delimiter, escape, and quote characters.Header Line Indicates whether to create a header line. Delimiter Character Delimiter character for a custom delimiter format. Select one of the available options or use Other to enter a custom character.
You can enter a Unicode control character using the format \uNNNN, where N is a hexadecimal digit from the numbers 0-9 or the letters A-F. For example, enter \u0000 to use the null character as the delimiter or \u2028 to use a line separator as the delimiter.
Default is the pipe character ( | ).Escape Character Escape character for a custom delimiter format. Select one of the available options or use Other to enter a custom character.
Default is the backslash character ( \ ).Quote Character Quote character for a custom delimiter format. Select one of the available options or use Other to enter a custom character.
Default is the quotation mark character ( " ).Replace New Line Characters Replaces new line characters with the configured string.
Recommended when writing data as a single line of text.New Line Character Replacement String to replace each new line character. For example, enter a space to replace each new line character with a space.
Leave empty to remove the new line characters.Charset Character set to use when writing data. -
For JSON data, on the Data Format tab, configure the following property:
JSON Property Description JSON Content Method to write JSON data:
_ JSON Array of Objects - Each file includes a single array. In the array, each element is a JSON representation of each record.
_ Multiple JSON Objects - Each file includes multiple JSON objects. Each object is a JSON representation of a record.Charset Character set to use when writing data. -
For protobuf data, on the Data Format tab, configure the following properties:
Protobuf Property Description Protobuf Descriptor File Descriptor file (.desc) to use. The descriptor file must be in the Data Collector resources directory, $SDC_RESOURCES.
For more information about environment variables, see Data Collector Environment Configuration. For information about generating the descriptor file, see Protobuf Data Format Prerequisites.Message Type Fully-qualified name for the message type to use when writing data.
Use the following format:<package name>.<message type>.
Use a message type defined in the descriptor file. -
For text data, on the Data Format tab, configure the following properties:
Text Property Description Text Field Path Field that contains the text data to be written. All data must be incorporated into the specified field. Record Separator Characters to use to separate records. Use any valid Java string literal. For example, when writing to Windows, you might use \r\n to separate records.
By default, the destination uses \n.On Missing Field When a record does not include the text field, determines whether the destination reports the missing field as an error or ignores the missing field. Insert Record Separator if No Text When configured to ignore a missing text field, inserts the configured record separator string to create an empty line.
When not selected, discards records without the text field.Charset Character set to use when writing data. -
When using the destination in a microservice pipeline, on the Response tab, configure the following properties. In non-microservice pipelines, these properties are ignored.
Response Property Description Send Response to Origin Enables sending a response to a microservice origin. Response Type The response to send to a microservice origin:
_ Successfully written records.
_ Responses from the destination system. -
On the Logging tab, configure the following properties to log request and response data:
Logging Property Description Enable Request Logging Enables logging request and response data. Log Level The level of detail to be logged. Choose one of the available options.
The following list is in order of lowest to highest level of logging. When you select a level, messages generated by the levels above the selected level are also written to the log:
_ Severe - Only messages indicating serious failures.
_ Warning - Messages warning of potential problems.
_ Info - Informational messages.
_ Fine - Basic tracing information.
_ Finer - Detailed tracing information.
_ Finest - Highly detailed tracing information.
Note: The log level configured for Data Collector can limit the level of messages that the stage writes. Verify that the Data Collector log level supports the level that you want to use.Verbosity The type of data to include in logged messages:
_ Headers_Only - Includes request and response headers.
_ Payload_Text - Includes request and response headers as well as any text payloads.
* Payload_Any - Includes request and response headers and the payload, regardless of type.Max Entity Size The maximum size of message data to write to the log. Use to limit the volume of data written to the Data Collector log for any single message.